
[ MAJ 06/2022 ]
ASTROKIT
est un système linux embarqué prévu actuellement pour une Raspberry Pi3, qui permet de contrôler deux moteurs pas à pas d'une monture de télescope, avec gestion logiciel des micro pas, afin de suivre un astre dans le ciel précisément en mode azimutal.Les rattrapages lents, rapides, comme sur une raquette de commande classique, sont possibles.
Le mode GOTO est en cours de développement.
Si vous possédez un RPI3, sans électronique, il est possible de brancher un clavier usb-bluetooth, d'interragir avec le programme, de choisir un astre à suivre, et de générer les signaux sur les broches GPIO.
Avec une télécommande infrarouge universelle, il est possible également d'interragir avec le programme en branchant une simple LED infrarouge sur un GPIO en particulier.
Toutes les caractéristiques de la monture / des moteurs , du suivi souhaité, numéros GPIO souhaités pour les moteurs et la LED, sont paramétrables dans un seul et unique fichier
ASTROKIT se présente actuellement comme :
- un système Linux compilé et patché temps réel mou (linux-rt) sous yocto branche hardknott
- le système est téléchargeable sous forme de bootfs.tar / rootfs.tar ou sdcard.iso
- le système est installable via une micro sdcard sur une RaspberryPi 3 (A+ ou B+)
- le portage vers d'autres cartes est en cours
- ssh possible après congiguration réseau wifi
- ou bien sur un terminal tty avec écran / clavier
Une fois installé sur une RaspberryPi, après mise sous tension,
le système démarre et lance automatiquement le binaire astrokit,
qui gère les entrées / sorties.
Dans ce système on trouve :
- système d'init par défaut : systemd
- mise à jour firmware pour la Rpi3a+
- applicatif embarqué temps réel prioritaire au niveau ordonnanceur : astrokit
- support wifi : paquet wpa_supplicant
- support bluetooth
- support i2c actif : pilote kernel chargé au démarrage + utilisation librairie perso
- support clavier interractif : C termios / ncurses via astrokit
- support infrarouge : paquet lirc 0.9.2 préconfiguré et patché au niveau noyau (nouvelle version, dtoverlay : gpio-ir.dtbo / pilote kernel : gpio-ir-recv.ko )
- plusieurs binaires et scripts bash de tests moteurs présents dans le répertoire /usr/local
dont le binaire gpio, qui permet de tester les moteurs avec plusieurs options
ASTROKIT is an embedded linux system currently planned for a Raspberry Pi3, which allows you to control two stepper motors of a telescope mount, with software management of microsteps, in order to follow a star in the sky precisely in azimuth mode.
Slow, fast catch-ups, like on a classic hand control, are possible.
GOTO mode is under development.
If you have an RPI3, without electronics, it is possible to connect a usb-bluetooth keyboard, to interact with the program, to choose a star to follow, and to generate the signals on the GPIO pins.
With a universal infrared remote control, it is also possible to interact with the program by connecting a simple infrared LED to a particular GPIO.
All the characteristics of the mount / motors, the desired tracking, the desired GPIO numbers for the motors and the LED, can be configured in a single file
ASTROKIT currently presents itself as:
- a Linux system compiled and patched soft real time (linux-rt) under yocto branch hardknott
- the system is downloadable as bootfs.tar / rootfs.tar or sdcard.iso
- the system can be installed via a micro sdcard on a RaspberryPi 3 (A+ or B+)
- porting to other cards is in progress
- ssh possible after wifi network congiguration
- or on a tty terminal with screen / keyboard
Once installed on a RaspberryPi, after powering up,
the system boots and automatically launches the astrokit binary,
which manages the inputs / outputs.
In this system we find:
- default init system: systemd
- firmware update for the Rpi3a+
- priority real-time embedded application at the scheduler level: astrokit
- wifi support: wpa_supplicant package
- bluetooth support
- active i2c support: kernel driver loaded at startup + use of personal library
- interactive keyboard support: C termios / ncurses via astrokit
- infrared support: lirc 0.9.2 package preconfigured and patched at kernel level (new version, dtoverlay: gpio-ir.dtbo / kernel driver: gpio-ir-recv.ko )
- several engine test binaries and bash scripts present in the /usr/local directory
including the gpio binary, which allows you to test engines with several options
Exemple de carte avec astrokit
Astrokit peut contrôler en mode micro-pas et en fonctionnement alt-azimutal ou équatorial :
- tous moteurs pas à pas avec ou sans réducteur jusqu'à 1A par phases (cela dépend du double pont en H utilisé)
- toute monture azimutale et/ou équatoriale motorisée jusqu'à 1A par phases
- toute monture azimutale et/ou équatoriale motorisée jusqu'à 1A par phases
Pour les montures équatoriales, il est nécessaire de pouvoir pivoter l'axe en ascension droite verticalement,
le transformant en axe en azimut. La déclinaison est réservée à l'axe en altitude.
Mais on peut paramétrer le programme pour que l'on puisse faire l'inverse.
Un masque de calcul 4bits permet de séquencer les signaux micro-pas des phases pour n'importe quel moteur.
Les moteurs typiquement pour ce projet varient de NEMA11 à NEMA17.
J'utilise le NEMA14 14HM11-0404S, avec une résistance par phase ~ 20 omhs
Le fait d'utiliser un réducteur (réducteur planétaire le plus souvent) améliore les performances en augmentant le couple.
J'utilise le NEMA14 14HM11-0404S, avec une résistance par phase ~ 20 omhs
Le fait d'utiliser un réducteur (réducteur planétaire le plus souvent) améliore les performances en augmentant le couple.
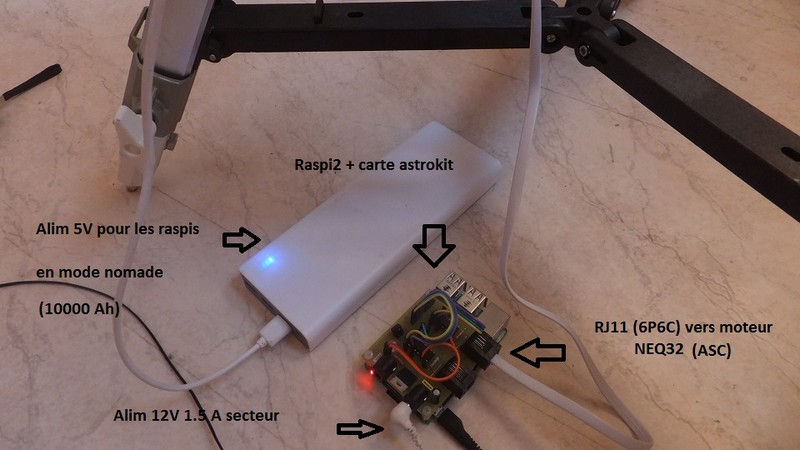
Voici un exemple de montage possible :
* alimentation 5V externe pour la carte raspi2 (boitier blanc)
* alimentation 9V externe pour les moteurs (4 piles dans la housse noir = alimentation NEQ32 par défaut)
en mode nomade :
* alimentation 5V externe pour la carte raspi2 (boitier blanc)
* alimentation 9V externe pour les moteurs (4 piles dans la housse noir = alimentation NEQ32 par défaut)
Astrokit can control in micro-step mode and in alt-azimuth or equatorial operation:
- all stepper motors with or without gearbox up to 1A per phase (depending on the double H-bridge used)
- any motorized azimuth and/or equatorial mount up to 1A per phase
For equatorial mounts, it is necessary to be able to pivot the axis in right ascension vertically,
transforming it into an azimuth axis. The declination is reserved for the altitude axis.
But we can configure the program so that we can do the opposite.
A 4-bit calculation mask is used to sequence the phase micro-step signals for any motor.
Typical motors for this project range from NEMA11 to NEMA17.
I'm using NEMA14 14HM11-0404S, with resistance per phase ~20 omhs
Using a gearbox (most often planetary gearbox) improves performance by increasing torque.
Here is an example of a possible setup:
in nomadic mode:
* external 5V power supply for the raspi2 board (white box)
* external 9V power supply for the motors (4 batteries in the black cover = default NEQ32 power supply)
[ MAJ 06/2022 ]
=> la tension d'enétrée sur les GPIO 5V n'étant pas régulée, il est vivement conseillé d'alimenter la pi par le port usb/uartc
=> the input voltage on the 5V GPIOs is not regulated, it is strongly recommended to power the pi through the usb/uartc port
l'alimentation moteur est ici non connectée
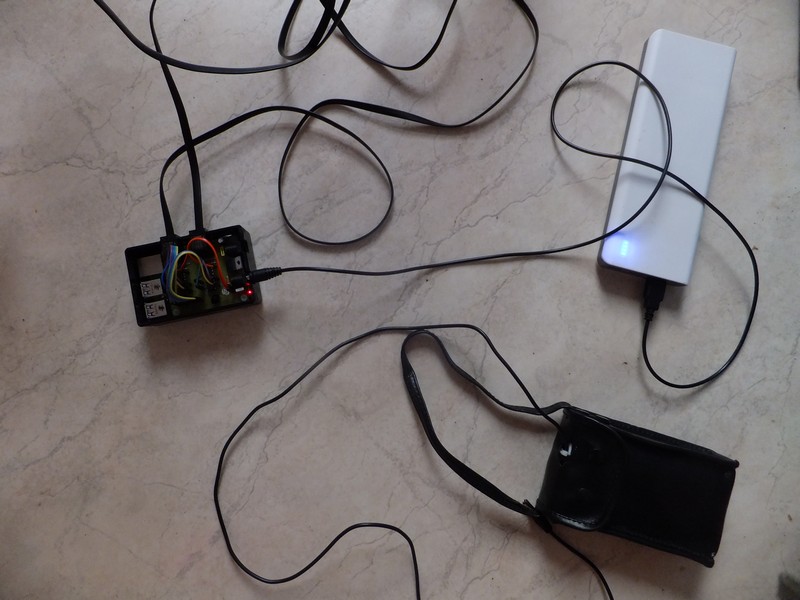
en mode chez soi :
* alimentation 5V-1A externe pour la carte raspi2 (chargeur de tel portable 5V-1A branché au secteur 220V)
* alimentation 12V-1.5A externe pour les moteurs (chargeur récupéré délivrant du 12V-1.5A branché au secteur 220V)
on peut activer le réseau pour communiquer avec la raspi
[ MAJ 06/2022 ]
=> la connexion réseau se fait via le wifi sur les Rpi 3

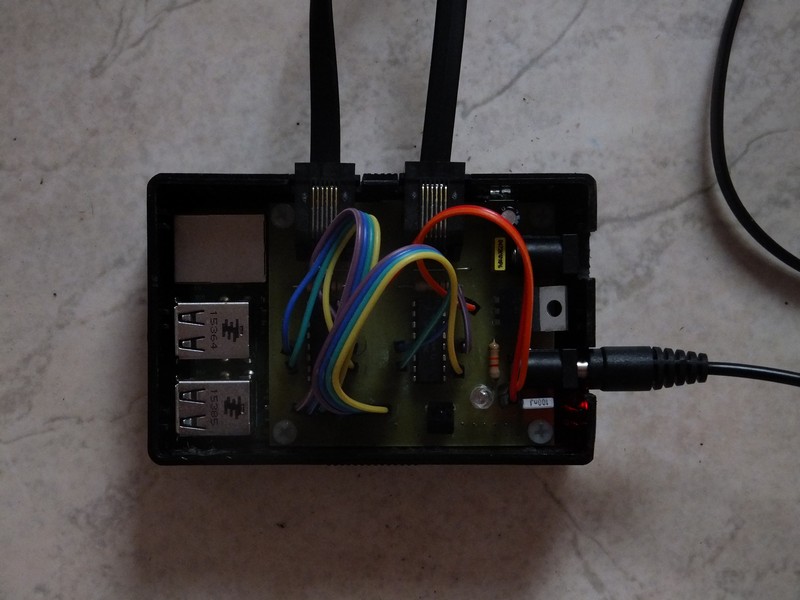
Le module électronique est enfiché sur la Rpi, qui se trouve en dessous.
La Rpi est alimentée soit par un cordon secteur 5V (chargeur de batterie de tel portable) soit par une entrée DC 5V (5.5-2.1)
Les moteurs sont alimentées par une entrée DC 6-12V (5.5-2.1).
Les deux entrées alimentation sont disponibles sur le module électronique
Il s'agit du dernier modèle développé : l'électronique est réduite au minimum, avec seulement : un étage de puissance pour les moteurs,
grâce aux doubles ponts en H SN754410NE, une diode IR en réception des signaux de la télécommande, et un régulateur de qualité
pour réguler la tension, uniquement dédiée au lissage de la tension moteurs.
Les deux câbles 6P/6C sont reliés aux moteurs de la monture NEQ3-2.
The electronics module is plugged into the Raspberry Pi 2, which is located underneath.
The raspi2 is powered either by a 5V mains cord (battery charger of such laptop) or by a DC 5V input (5.5-2.1)
The motors are powered by a DC 6-12V (5.5-2.1) input.
The two power inputs are available on the electronic module
This is the latest model developed: the electronics are reduced to a minimum, with only: a power stage for the motors,
thanks to the double H-bridges SN754410NE, an IR diode in reception of the signals from the remote control, and a quality regulator
to regulate the voltage, only dedicated to smoothing the motor voltage.
The two 6P/6C cables are connected to the motors of the NEQ3-2 mount.
Le module est donc composé de
- une entrée alimentation DC 5V (raspi)
- une entrée alimentation DC 6-12V (moteurs)
- une led ir tsop (diode réceptrice infrarouge)
- une led d'état (simple diode électroluminescente)
- une led ir tsop (diode réceptrice infrarouge)
- une led d'état (simple diode électroluminescente)
- deux doubles pont en H (SN754410NE) 1A
- deux sorties 2 x 4 phases moteurs pas à pas unipolaires / bipolaires
- connectique .... (RJ11 6C/9P mais RJ45 acceptable)
- deux sorties 2 x 4 phases moteurs pas à pas unipolaires / bipolaires
- connectique .... (RJ11 6C/9P mais RJ45 acceptable)
[ MAJ 06/2022 ]
- un dongle usb bluetooth permet de connecter le clavier et interragir avec le programme
- la connexion réseau se fait via le wifi
- l'alimentation 5V se fait directement sur le port usb-uart
- pour les doubles ponts en H, il est possible d'utiliser le L198N ou bien le SN7544110, sous forme de modules prêts
- un écran LCD1602 via I2C prend en charge l'affichage pendant l'exécution du programme
- la connectique RJ12 sera remplacé par des RJ45 en gardant les câbles RJ12 4 contacts
Les schémas électroniques / schémas de circuit imprimé sont disponibles dans la partie téléchargement
Le système Linux présent sur la sdcard est compilé et patché avec un logiciel embarqué temps réel :
- doit être installé sur une micro-sdcard (2G suffit , classe 4 ou 10)
- la sdcard doit être elle même être installée sur le port réservé à cet effet sur la Rpi.
Le système et/ou le logiciel est disponible dans la partie téléchargement
[ MAJ 06/2022 ]
=> le nouveau système (prévu pour Rpi3A+ / Rpi3b+ ) sera disponible courant 2022
The module is therefore composed of
- a DC 5V power input (raspi)
- a DC 6-12V power input (motors)
- a tsop ir led (infrared receiver diode)
- a status led (single light-emitting diode)
- two double H-bridge (SN754410NE) 1A
- two outputs 2 x 4 phase unipolar / bipolar stepper motors
- connectors .... (RJ11 6C/9P but RJ45 acceptable)
[ Update 06/2022 ]
- a usb bluetooth dongle allows you to connect the keyboard and interact with the program
- the network connection is via wifi
- the 5V power supply is done directly on the usb-uart port
- for double H-bridges, it is possible to use the L198N or the SN7544110, in the form of ready modules
- an LCD1602 via I2C supports display during program execution
- the RJ12 connectors will be replaced by RJ45s keeping the 4-way RJ12 cables
Electronic schematics / PCB diagrams are available in the download section
The Linux system present on the sdcard is compiled and patched with real-time embedded software:
- must be installed on a micro-sdcard (2G is enough, class 4 or 10)
- the sdcard must itself be installed on the port reserved for this purpose on the Rpi.
The system and/or software is available in the download section
[ Update 06/2022 ]
=> the new system (planned for Rpi3A+ / Rpi3b+) will be available end 2022